Tutorial Component Development
To create an ESROCOS project, step into the ESROCOS workspace and source the ESROCOS environment script. Then, call esrocos_create_project to create your first ESROCOS component.
cd ~/esrocos_workspace/
source env.sh
esrocos_create_project
The ESROCOS project creation script needs some information about the new project. The first prompt requests the name of the component in the format [package type]/[project name]. Type tutorials/driver. The second prompt asks for the package set in which your component should be integrated. The integration of a component in autoproj will be addressed in a next tutorial. For now, add your component to the universe package set. Finally, we can add other packages that the new project depends on. The project of this tutorial depends on only one package, types/base, a package which provides the most central ESROCOS data types.

With that information, the ESROCOS tool will create a project folder together with the first artifacts and files.
Step into the new project folder and have a look around.

The building and installation of ESROCOS relies on CMake. Consequently, you will find here a CMakeLists.txt file, which you should edit if you need to add new subdirectories, libraries and types. For this tutorial, we will not need to change this file.
The dependencies are managed through esrocos.yml (used by the ESROCOS scripts) and through manifest.xml (which is used by autoproj). If you need to add or change dependencies, you need to update both files.
Finally, the model folder includes a TASTE model which will be edited ahead.
Every time a new project is created and every time the dependencies in esrocos.yml and manifest.xml are modified, it is necessary to call the esrocos_fetch_dependencies script to let autoproj checkout and install/update the stated dependencies. Also, all data types will be compiled by asn2aadl into one DataView.aadl file, so the types will be available to TASTE.
cd ~/esrocos_workspace/tutorials/driver
source env.sh
esrocos_fetch_dependencies
Call the esrocos_edit_project script to open your project in the TASTE GUI. On the left side, under the bullet DataView, you will find all the data types you imported to the project which are now usable within TASTE.
cd ~/esrocos_workspace/tutorials/driver
source env.sh
esrocos_edit_project
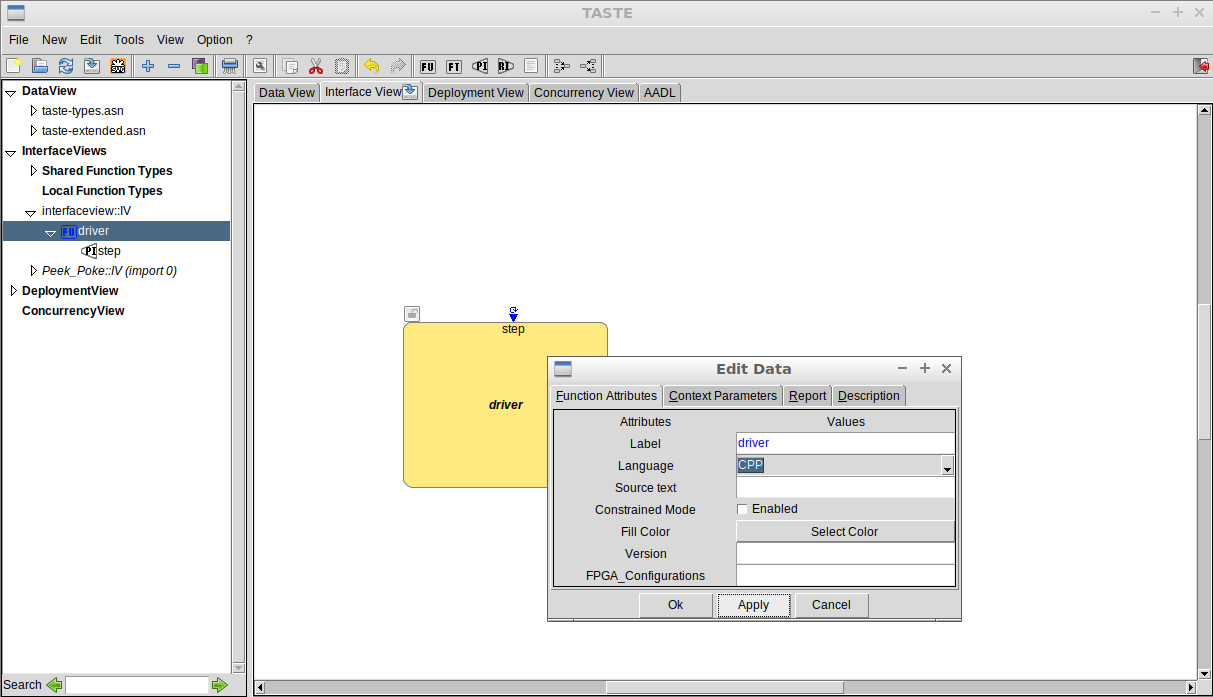
On the canvas to the right, you can create a TASTE function by using the context menu (right click) and choose New Function or by using the FU button in the toolbar on top. Various settings can be set for the function by right-clicking on it and selecting Edit Properties. ESROCOS, by default, generates the TASTE model with a hello world TASTE function. Rename it to driver and set the source language to C++ (CPP).
A TASTE project is made up of functions connected over Required Interfaces (RI) and Provided Interfaces (PI). Our function already has a PI called step, so you can take a look at its properties by double clicking on it. A PI is an ingoing connection. In this case, we want a cyclic interface to drive our system. Rename the PI to clock, select the option cyclic, and set the PI period and its other time settings to 100ms each.

Next, add an RI (an outgoing connection), either by right clicking in the function and selecting New RI or by clicking in the RI option in the top toolbar. This RI will be called from within the function and, in turn, will call the code of the method it will be later connected to. Edit its properties by double-clicking on it and set the option Inherits from PI to false and change its Label to trigger_out. Further settings include the parameters the RI method needs to be called with.

Save your work and generate the code skeletons for your functions by calling the esrocos_generate_skeletons script.
cd ~/esrocos_workspace/tutorials/driver
source env.sh
esrocos_generate_skeletons
This script will generate a folder name driver with the source code files, driver.cc and driver.h. The header file should not need manipulation, as it should be managed by TASTE. Open and edit the code of driver.cc to call the RI method defined in the header:
#include "driver.h"
#include "driver_state.h"
//#include <iostream>

// Define and use function state inside this context structure
// avoid defining global/static variable elsewhere
driver_state ctxt_driver;


void driver_startup(void)
{
   // Write your initialisation code, but DO NOT CALL REQUIRED INTERFACES
   // std::cout << "[driver] Startup" << std::endl;
}

void driver_PI_clock(void)
{
   // Write your code here
   driver_RI_trigger_out();
}
The building and installation of ESROCOS relies on CMake. In the model folder of your project (~/esrocos_workspace/tutorials/driver/model) you can find a CMakeLists.txt template. Edit this file and change it according to the figure below (change the reference to the default hello_world source directory to the driver source directory). The esrocos_build_taste function is a CMake function that builds a TASTE model. By changing the CMakeLists.txt we are stating that the function implementations are in the driver folder and not in the default hello_world directory.

Now, compile the code using the amake command.
cd ~/esrocos_workspace/tutorials/driver
source env.sh
amake
This will install your component in esrocos_workspace/install/share/taste_components. Go back to edit your project using the esrocos_edit_project script. Double-click on the driver function to edit its properties and right-click on Source Text. Select the driver.zip file (~/esrocos_workspace/install/share/taste_components/driver.zip) created during the building process.

Build your code again using the amake command. Congratulations, you developed a driver component and exported it, so it can be reused in future system integration.
Copyright © 2017 EUROPEAN SPACE ROBOTICS CONTROL AND OPERATING SYSTEM (ESROCOS)
This project has received funding from the European Union’s Horizon 2020 research and innovation programme under grant agreement No 730080
