📢 Announcement: We're looking for contributors! Check out our list of features we'd like to implement. If you're up for a challenge, feel free to assign an issue to yourself and create a pull request.
ShockTimeServer automatically sets the correct time on your Casio G-Shock watches. Like your G-Shock itself, it’s designed to be set-and-forget. Just start the server once—it will run reliably for months with no user intervention.
The server can run on a Raspberry Pi device with a small LCD display, or can run headless on any device with Bluetooth and Python.
Works with many G-Shock, Edifice, and Pro Trek variants. Here are the models reported to be compatible with the app and their modules.
💡 Note: By compatible watches we mean that these watches can work with the app, but this does not mean that every function of the watch is supported by the app. For example, fitness functions are not implemented in the app.
| Model | Module Number(s) |
|---|---|
| GW-B5600 | 3461 |
| GM-B5600/GMW-B5600 | 3459 |
| GMW-B5000 | 3459, 3461 |
| GW-5000 | 3159, 3495 |
| GA-B2100 | 5689 |
| GST-B500 | 5684 |
| GST-B200 | 5608 |
| MSG-B100 | 5659 |
| G-B001 | 3519 |
| GBD-800 | 3464 |
| GBD-H1000 | 3475 |
| MRG-B5000 | 3541 |
| GCW-B5000 | 3543 |
| GG-B100 | 5594, 5595 |
| ABL-100WE | 3565 |
| Edifice ECB-10 | 5618, 5604 |
| Edifice ECB-20 | 5638, 5603 |
| Edifice ECB-30 | 5686, 5672 |
We are looking for feedback about the accuracy of this table, so please comment in the Issues section with any discrepancies.
The server waits for watches to connect via Bluetooth, and sends them the time once connected.
-
Automatic time sync
-
Multi-watch support
-
Optional display support
-
Raspberry Pi integration
-
GitHub auto-updates (if applicable)
- Start the server:
- Short-press the lower-right or long-press the lower-left button on your G-Shock watch to connect.
- Once connected, the app will automatically set the correct time on your watch.
- If AUTO TIME ADJUSTMENT is enabled, the watch will sync up to four times daily.
💡 Note: In addition to this repository, we have created another repo on GitHub (https://github.com/izivkov/gshock-server-dist), specifically for distribution. It holds all the files necessary to run the server and no more. This repository is preferable for getting the distribution files, since it also controls versioning. Installing dependencies for the display can get a bit complex, so we provide setup scripts, which use this repository to automatically set up your device.
💡 Note: There are two versions of the server:
gshock_server.py – for headless use (no display)
gshock_server_display.py – for devices with an attached display
To quickly get started with the headless server (on a device without a display), follow the steps below. For a more thorough and permanent installation, refer to the setup scripts described later in this document.
💡 Note: You will need minimum Python version 3.12.
We now use uv to manage and run the server:
Install uv if needed:
curl -LsSf https://astral.sh/uv/install.sh | sh
Create and activate virtual environment:
uv venv
source .venv/bin/activate
Install the dependencies:
uv sync
Run the server:
uv run src/gshock-server/gshock_server.py
The optional --fine-adjustment-secs allows you to fine adjust the time setting by providing an offset in seconds.
On the Pi devices, you can also connect a small LCD display to monitor the operation of the server.

Pi Zero with Waveshare display

Pi 3 with 1.54" TFT SPI LCD display
These instructions will guide you how to start from a blank SD card and install all you need to run the server on Pi 3/4 or Pi zero.
There are two ways to create your SD card: 1. Using a pre-build image, or 2. Start with a fresh SD card and download and setup the software.
This image works for both Pi Zero and Pi 3.
-
Download time-server-pi.img.gz.
-
Use the Raspberry PI Imager to flash to an SD card
- Use an SD card with a minimum of 4GB. Start the Raspberry Pi Imager
- Choose your target device
- For OS choose "Use Custom", and select the image file
time-server-pi.img.gzyou just downloaded. - Select as storage a new SD you have mounted
- Click NEXT, and edit your settings. Here you can enter your networks SSID and password. Also, from the Services tab, enable SSH.
- Apply settings when asked, and flash your SD. You should be able to now boot your Pi.
- The image is configured to use the
wavesharedisplay. If you are using a different display, like thetft154ormockafter booting your Pi, you need to manually set the display type in file/etc/systemd/system/gshock.service. After that, restart the service:
sudo systemctl daemon-reload
sudo systemctl enable gshock.service
sudo systemctl start gshock.service
If you prefer to download and setup the software yourself, here are the instructions:
Use an SD card with a minimum of 4GB size and flash new image using the Pi Imager. Select your device, OS (select Lite), and your storage. Don't forget to set your Wi-Fi network and password, and make sure SSH is enabled.
Use the flashed SD card to boot your Pi and SSH into it. Next we need to get the software from a GitHub repository. To do that, first install the git package on your device:
sudo apt-get -y install git
and then get the software:
git clone https://github.com/izivkov/gshock-server-dist.git
This will create a directory gshock-server-dist containing a number of shell scripts needed to set up the server. Note that running the scripts takes relatively long time. In the Pi 3/4, typically half an hour. On the Pi Zero, let it run overnight ;-).
Pro Tip: If you have another Raspberry Pi device in addition to the Pi Zero, you can set up the server on that device and use the same SD card on both.
The key is to use a 32-bit OS when creating the image with Raspberry Pi Imager, as it ensures compatibility across all Pi models, including the Pi Zero.
cd gshock-server-dist
This script installs the basic software, dependencies, creates Python virtual environment, sets up a service to start the server each time the device is rebooted, etc. For a device with no display, this is sufficient to run the server.
Installs all display-related dependencies, such as luma, spidev, numpy, pillow. While installing, it will ask you to select the display type.
If you enter the wrong display type, you can change it later by editing the file /etc/systemd/system/gshock.service and change the --display parameter value to one of waveshare, tft154 or mock. Reboot.
💡 Note: You need to run both setup.sh and setup-display.sh.
This script creates a service and another script, onboot.sh, to run on reboot. onboot.sh disables Wi-Fi power saving mode and restarts the G-Shock service once Wi-Fi is up. This is done to address some stability issues with the Pi Zero, where the device may lose Bluetooth and Wi-Fi connectivity. If you are not experiencing these issues, there is no need to run this script, but you can add your own commands in onboot.sh instead.
This script will enable the Linux driver needed for the display. Without this step, the display will not work. Reboot when asked after the script runs.
Runs all the scripts above in one step.
If you have used the scripts to install the software, a service file /etc/systemd/system/gshock.service will be created. This will start the server automatically when rebooting.
Some watches, such as the DW-H5600 or the Edifice ECB-30, continuously attempt to connect to the server. This behavior interferes with other watches, so they are limited to connecting only once every 6 hours. This is achieved by passing a built-in filter function to the connection:
connected = await connection.connect(watch_filter.connection_filter)
You can change this behavior by either not passing the filter function or by providing your own custom filter.
Short-press the lower-right or long-press the lower-left button on your G-Shock watch to connect. The watch will connect and its correct time will be set by the server. The watch then will be disconnected. If you use the lower-left button, in addition to setting time, the display on the Pi device will be updated with information about the current state of the watch. lower-right button will just update the time.
If your watch is set for auto-update time, the watch will connect automatically and update its time every 6 hours.
If you have not set the service to start your server at boot time, you can start it manually:
python3 src/gshock_server_display.py [--fine-adjustment-secs SECS] --display [waveshare|tft154|mock]For development without a physical display, you can select the mock display option. You can then watch file oled_preview.png being created and modified in the root directory of the project.
✅ Welcome Screen

Displays the current watch name and last sync time.
🔗 Connected Screen

Shown briefly when a new connection with the watch is established.
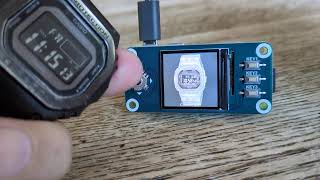
🕒 Detailed Info Screen

Shows details about the last connected watch, including time of last sync, next alarm, and reminder.
If you're running the server on a Raspberry Pi Zero or another Pi model, you can attach a small SPI-based LCD display to visually monitor the system status.
➡️ If you're using a Pi Zero, make sure to get a model with a pre-soldered 40-pin GPIO header, such as this one.
💡 Note: We have experienced some stability issues with the Pi Zero, specifically, loss of Wi-Fi and Bluetooth connections. We recommend using the Pi Zero 2 WH instead, as mentioned in the link above.
Currently we support the following 240x240 color displays:
| Display Type | Description | Notes |
|---|---|---|
waveshare |
Waveshare 1.3" SPI LCD module HAT, ST7789 Controller | Widely available color display. Directly plugs into the Pi's 40-pin header. |
tft154 |
1.54" TFT SPI LCD, ST7789 Controller | Inexpensive generic display. Requires jumper wires to connect to GPIO header. |
mock |
No physical display | Simulates a display to oled_preview.png. Useful during development or headless testing |


This is the easiest option to set up. It has a female 40-pin connector that mates directly with the Pi's GPIO header—no wiring needed and fewer connection errors.
👉 You can get it here


This is a lower-cost generic display with the same ST7789 driver chip. It must be wired using jumper cables to the correct GPIO pins.
👉 You can get the display here
👉 And the Jumper Wires here
Here is how to connect the 1.54"-TFT-SPI LCD to Raspberry Pi 40-pin header:
| LCD pin | Purpose | Raspberry Pi physical pin | Pi BCM GPIO | Notes |
|---|---|---|---|---|
| VCC | 3.3 V supply | 1 (3V3) | — | The ST7789 is 3.3 V‑only—never feed 5 V |
| GND | Ground | 6 (GND) | — | Any ground pin is fine |
| SCL or CLK | SPI clock (SCLK) | 23 (GPIO 11) | GPIO 11 | Part of SPI0 |
| SDA or MOSI | SPI data (MOSI) | 19 (GPIO 10) | GPIO 10 | Display is write‑only, so MISO isn’t used |
| CS | Chip‑select | 24 (GPIO 8 / CE0) | GPIO 8 | Or pin 26 (CE1 / GPIO 7) if you prefer |
| DC (A0, D/C) | Data/Command select | 18 | GPIO 24 | Any free GPIO works—update your code accordingly |
| RES (RST) | Hardware reset | 22 | GPIO 25 | Tie to 3 V3 if you don’t need GPIO reset |
| BL (LED) | Back‑light | 12 (GPIO 18) | GPIO 18 | Drive with PWM to dim, or link to 3 V3 for always‑on |
You also need to enable SPI on the Pi. This should already be done by the enable-spi.sh script, but here is how to do it manually
sudo raspi-config            # Interface Options ▸ SPI ▸ Enable
sudo reboot
If your watch is not connecting, remove config.ini file and try again.
To see output from the service do:
journalctl -u gshock.service -f
Also check out this even tinier server running on an ESP32 microcontroller: