Docker is a containerization tool desgined to store software in a special units called Containers for ease of deployment and access in any Operating System that supports Docker.
- Containerization, a Special functionallity of Docker and many other containerization programs, it builds and packs and holds the software and it's dependencies in a single package called image.
- When this image is executed it turns into a Container and runs above an engine that controls the flow of data/resources (similar to a hypervisor but not quite) in this case it'll be the Docker Engine.
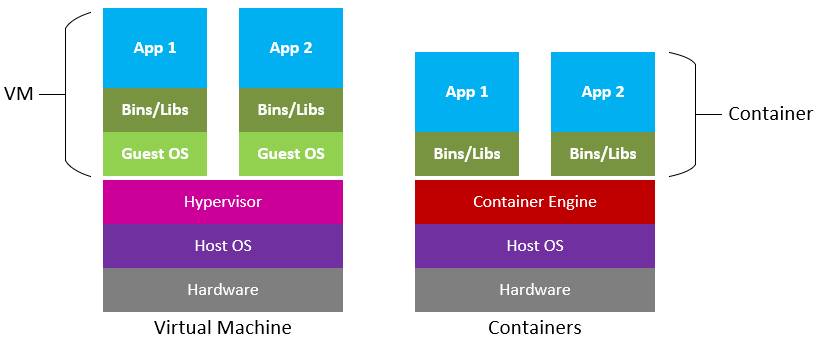
- Here's a small diagram that shows the structure of docker containers vs a virtual machine:
- As you can see in the diagram. Containers lack the basis of any Real/Virtualized System, OS & Kernel. All resource management happens between the Engine and Host OS.
- Docker Engine is a tool that allows for seamless management of resources and control of all containers running.
- The engine consists of a Daemon that manages containers and their running state in the background, Command-Line Interface (CLI) a user can interact with to pass commands/directives/inspect/remove containers/volumes/networks and finally an API that allows for communication between the CLI and the Daemon
- Docker Engine controls every aspect of a container from volumes and networks to the innard of a container, this allows for ease of building and deployment of containers without major issues setting in.

-
Dockerfiles consist of several instructions that control how the software and it's dependencies inside will be installed and ran.
-
The following Example will feature the structure and several instructions that are necessary when docker builds the image:
# FROM informs the builder of which base image your custom image will be built on and it's version FROM debian:bookworm # ARG takes arguments passed to docker build or you can assign a value to it ARG VAR # ENV creates an environment variable during build and runtime. ENV ENV_VAR=VAR ENV ENV_VAR2=VALUE # RUN runs a shell command, here where you might want to install your desired software and it's # dependencies RUN apt update && apt-get install -y -f mariadb-server # COPY copies files from the dockerfile directory into the image, here you might want to # copy a configuration of some sort or a shell script that does the setup COPY DOCKER_FILE_DIR/Configuration.sql DIR_INSIDE_CONTAINER/Configuration.sql COPY DOCKER_FILE_DIR/Tool.sh DIR_INSIDE_CONTAINER/Tool.sh RUN bash /Tool.sh # EXPOSE exposes a port that only containers that are linked to the same docker network will be able #to access, possible webservice apps? EXPOSE 3306 # CMD informs the builder of the command that will be first ran after the container turns on. CMD [ "mariadbd", "--bind-address=0.0.0.0" ] -
You can build your image using the following command:
 # -t Option to specify the image name.
 docker build -t CONTAINER_NAME /path/to/dockerfile/
- Docker Network gives containers the ability to communicate with each other with restricted access from outside (Host OS, Internet).
- Two Important Network types are Bridge/User Defined Bridge & Host .
- Bridge: Creates a common Gateway and preforms Automatic Subnetting to all containers inside the network, also all containers benefit from Docker DNS Resolver which means all containers will be accessible inside the network using their hostnames (Container Name) instead of their IP addresses.
- Host: In this mode the container will share the network with the host and can be accessible using the host IP address.
- The following diagram should visualize the difference between these types of networks:
- Each mode has it's upsides and downsides but in multi web services it's assumed that bridge mode works better than host.
- You can run a container with a network attached using the following command:
docker run -t CONTAINER_NAME --network=NETWORK_TYPE

- Docker Volume is a special mounting function that allows direct file access between the host and the container.
- There are two types of volumes in docker: Named Volumes and Anonymous Volumes.
- Named Volumes are what their name describes, a volume that has a name and can be mounted using only their name.
- Anonymous Volumes require the user to specify where will the mount point on the host machine be each time they're mentioned.
- You can create a lot of volumes and specify where they'll be mounted, here's the instruction:
VOLUME /container/dir - Creation and mounting of a volume in shell cli:
 #Creation of a volume
 docker volume create VOLUMENAME
 #Only Choose one of the last two parameters (read_write/read_only), -v to specify the mount points
 docker run -t CONTAINERNAME -v VOLUME_DIR:CONTAINER_DIR:rw/ro
 # This one for named Volumes:
 docker run -t CONTAINERNAME -v VOLUME_NAME:CONTAINER_DIR:rw/ro
- Docker-Compose is a special tool desgined alongside docker to ease the management of multiple containers.
- Docker-Compose takes directions from a file called docker-compose.yml.
- Inside docker-compose.yml file there's instruction on how will docker build and run a container.
- The following example will feature important instructions that will ease building and deployment of containers:
version: '3' services: SERVICE_NAME: build: context: DOCKERFILE/DIR args: - VAR=VALUE container_name: SERVICE_NAME expose: PORT_NUMBER networks: - NETWORK_NAME volumes: - VOLUME_DIR:CONTAINER_MOUNT_DIR:rw (or ro, also you can use named volumes here) networks: NETWORK_NAME: type: bridge - Each instruction serves a purpose as it replaces the long method of running the basic docker build command and all the options and arguments passed with a fast way to build and deploy your containers, here's what each instruction do:
-
version: this instruction specifies what docker-compose version this file will run on, be aware that certain functionalities mentioned in docker-compose might be incompatible with docker-engine hence you have to do your own research on which versions are most compatible with what you're looking for.
-
services: here you can list all services (ie. images) docker-compose will try to build and run, each service has it's own parameters and variables/arguments that will be passed to it during build/run time.
-
build: here you'll be able to control many aspects of your image during build time, from the name of the container to the variables and arguments passed to it.
-
context: this instruction requires you to pass the directory where the dockerfile will be.
-
args: allows you to pass arguments during build time, example of arguments would be credentials, api keys...etc.
-
expose: allows you to expose a container port inside docker network, all containers connected to said network will be able to access this container during runtime.
-
networks: (inside services) here will you put networks your container will be connected to.
-
volumes: directive that allows you to mount any volumes your service might need, it can accept both Anonymous & Named Volumes.
-
networks: here you'll be able to create various networks and define their types.
-
type: network type, two of them are mentioned above.
- You can build a docker image using docker compose just by invoking the following command:
 # WARNING: you have to execute this command in a directory that has a docker-compose.yml file
 docker-compose build
 # Otherwise you can specify the directory of docker-compose.yml file.
 docker-compose build -f /path/to/docker-compose.yml
- Command will then build the docker image using all the variables and arguments passed as parameters
- Once the build has finished you can then run the container using the following command:
 docker-compose up SERVICE_NAME
 # Or if you want to run all containers run the following:
 docker-compose up